


Construction
Financial Benefits | Environmental Benefits | Safety & Convenience
Construction | Durability | Aesthetics| FAQs
Surface Treatments | Reinforcing | Embeds and Inserts | Concrete Placement
Panel Lifting | Panel Finishing | Insulated Panels
A successful Tilt-Up project begins long before concrete is poured. As with any project, the key is thorough planning. An experienced Tilt-Up contractor can be successful on a wide variety of projects. The beginner, however, should choose more carefully. Below is an explanation of the basic methods and skills required for successful Tilt-Up construction.
 Site evaluation
 Planning begins with an evaluation of the site. A large, flat, open site is ideal, but not common. Therefore, evaluate the site with regard to slab layout and the movement of materials and equipment around the slab. If the site is tight around the building, consider sequencing the pouring of slabs and panels from within the building.
A plan or sketch showing the pouring and erection sequence relative to the site and floor plan of the building can identify potential problems.
Engineering
Engineering is a critical phase of Tilt-Up projects. Consult an engineer with experience or familiarity with Tilt-Up construction and current design methods. Current recommendations for many aspects of Tilt-Up, particularly engineering, are presented in ACI 551R (Ref. 1).
Engineering Tilt-Up panels to withstand service and lifting loads is critical. But using a design that is too conservative could produce panels that are thicker and heavier than required. The net result could be larger footings, bigger cranes, more panels, and more joints-- all of which can increase the cost of the project to the point where it is not cost-competitive.
The thickness of a concrete panel usually is determined by a quantity called the slenderness ratio. This is the ratio of the unsupported panel height (usually the distance between the floor slab and the roof structure attachment) to the panel thickness. The generally accepted slenderness ratio on Tilt-Up walls is 50. However, a qualified engineer should make the final determination.
Floor slabs must be designed to support crane loads during erection. These loads may exceed building occupancy loads in some cases, so select the crane early in the project. Most contractors use at least a 5- or 6-inch-thick slab, unless structural requirements dictate a thicker one.
 Panel connections to the footings, floor system, roof, and between panels also are details designed by an engineer, and must be determined before construction.
The loads applied during lifting generally have the greatest affect on the panels. Locations of openings, lifting inserts, and other parameters must be considered. Additional reinforcement usually is needed to accommodate these loads. Tilt-Up accessory suppliers can be helpful in this aspect of design. Most will provide panel layouts indicating locations of lifting inserts and other information critical for erecting the panel.
A product of the design phase should be a drawing of each panel, preferably showing both the front and back, and insert and embed locations. The contractor or engineer should produce a building floor plan showing the layout of every panel on the slab and the erection sequence.
Several other items must be considered during the planning and engineering phases of the project. These include surface treatment, anticipated weather conditions, and material and equipment availability. For example, if the panels are to have deep reveals, a thicker panel might be required since the cross section of the panel could be reduced at a critical point by the reveal.
Careful consideration should be given to the size, location, and attachment of temporary wall braces. Here, again, Tilt-Up accessory suppliers can be helpful. Experienced Tilt-Up engineers also can offer economical bracing schedules.
Footings and Floor Slabs
 Once planning is complete, construction can begin. Install footings as level as possible, with attachment plates (if used) placed properly. Spread footings are used most often for Tilt-Up buildings, but pier footings can be considered if conditions warrant their use.
Footing locations, heights, and dimensions should be checked and verified for correctness. Crane time is expensive if modifications must be made while a panel is suspended over an incorrect plate or footing. Setting a panel down after it has been lifted interrupts the construction schedule. Also, panel lifting hardware may be designed for only one pick, so repeated handling can reduce the safety factor for that hardware.
Minor mistakes in floor slab construction often can be masked or corrected. A poor floor slab, however, can affect the appearance of the Tilt-Up panel. The slab should be smooth and hard and contraction joints should be positioned where they will have minimal impact on the panel. If the joint must fall beneath the panel, clean the joint and fill it with caulk.
Floor sealing or hardening compounds must be compatible with any chemicals or paints used on the panels or there may be problems when the panels are stripped or painted.
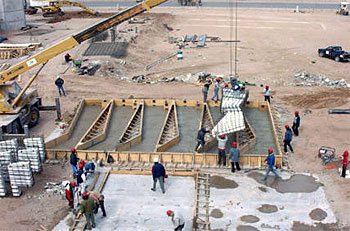
Panel Formation
The standard practice in laying out panels is to snap a chalk line on the floor slab. These lines indicate panel perimeters and the forms should be placed against them. Wood 2x's are the most common material used for side forms. Often the panel depth is designed to fit the depth of standard dimension lumber, so 5½- and 7¼-inch-thick structural panels are common.
The form sides can be supported and secured to the slab by a wood or steel angle support. Any common concrete anchor can be used to attach forms to the slab. Remember that holes in the slab left by anchorages must be repaired.
 There are several ways to form individual panels. One way is to form the perimeter of a series of panels, then use 1x or 2x strips to divide the area into panels. Advantages of this method include less forming and reduced forming lumber costs. Close joint tolerances from panel to panel can be maintained since adjacent panels share a form.
A variation of this method is to cast a large slab, then saw joints into the slab to form individual panels after the concrete has been troweled.
Use cant strips at the juncture of the side form and slab. They reduce spalling when stripping forms, help close off the bottom of the form to reduce concrete leakage, and give a neater appearance. A bead of caulk often is added as an additional seal between cant and reveal strips and the slab.
Form door and window openings after framing the panel perimeter. Brace the interior of the openings to prevent bowing or movement. Use cant strips between the opening forms and slab. If the opening is closer than 24 inches to a panel edge, a strongback may be needed for additional support during panel lifting and placement.
Apply form release agent and bond breaker to the slab and forms as recommended by the manufacturer. A wide variety of materials are available. Compatibility between bond breakers, form release agents, and paints or coatings used on the panels is critical. Check compatibility by consulting with the product suppliers.
Surface treatments
 It is popular to impart a pattern or texture to the face of Tilt-Up panels using reveal strips. Typically, these strips are anchored to the base slab after side forms are erected, but before reinforcement is placed. Concrete nails or other anchors often are used to fasten the strips. This surface treatment must be carefully planned and executed, but the results are striking. A reveal strip that is 1 inch off is difficult to correct once the panel is erected.
Other finishes include exposed aggregate, sandblasted, and brick or stone facings.
Reinforcing
The steel grid for reinforcing Tilt-Up panels is typically tied in-place after the side forms are erected. Standard Grade 40 or 60 bars are used. The use of plastic support chairs instead of steel chairs is recommended to avoid rust on the panel face. If steel chairs must be used, use a type that is plastic-tipped.
Check to make sure the tips are in place just before the pour. If insulated panels are used or the pour is on a sand bed, use chairs with sand feet. The weight of the steel can force a standard chair foot into the sand or insulation.
Use the correct chair height to maintain the proper depth of the reinforcing.
Embeds and Inserts
 The next step is to install embeds and inserts. Embeds are pre-fabricated steel plates with lugs that are cast into the panel to attach it to the footing, other panels, or the roof system, or for attachment of building accessories after the shell is completed. They can be attached to the side forms if they are on the panel edges, or they can be wired to the reinforcing.
Inserts provide the attachment points for lifting hardware and braces. They usually are sized by the supplier, who also should furnish engineering drawings showing insert locations. Install inserts according to the manufacturer's recommendations.
If there is a field change in panel size, opening location, or other conditions, the insert supplier should be contacted to confirm the location and selection of hardware.
Concrete Placement
Before placing concrete for Tilt-Up panels, clean the base slab. Use compressed air to blow away dirt, leaves, and other loose debris. Also, remove any standing water on the slab.
Concrete placement methods for Tilt-Up panels are the same as those for floor slabs. Since the panels are structural members, make sure the concrete mix meets specifications. Direct chute placement is the most economical method, but pumping and bucket placement also work. Consolidate the concrete to ensure good flow around the reinforcing steel. A trowel finish is suitable for most projects.
As with other types of concrete construction, plan for the unexpected. If the weather will be cold, have insulation blankets ready. If it looks like rain, delay the pour or have a suitable covering material available. Provisions should be made to block off a pour if a concrete truck breaks down or gets stuck in traffic. On hot or windy days, be prepared to cure the panels by water misting or by applying a suitable curing compound.
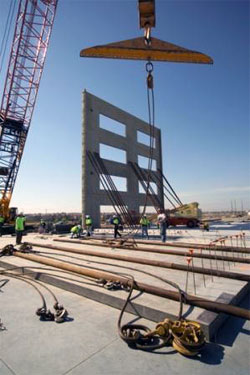
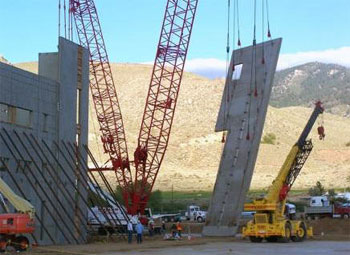
Panel Lifting
 The erection sequence should be determined well in advance, but it's a good idea to review it immediately before panel erection. Also, thoroughly review safety procedures with all Tilt-Up crew members to help prevent accidents. Discuss crane operation, bracing and anchorage details, cable releases, and job communication.
Locate and clean inserts and embeds and attach braces before lifting the panels. It is much quicker and safer to do this work while the panel is flat rather than doing it on a ladder after the panel is upright.
Don't remove braces until after the roof and decking are installed.
Once braces are removed, workers can patch holes in the floor and complete other finish work.
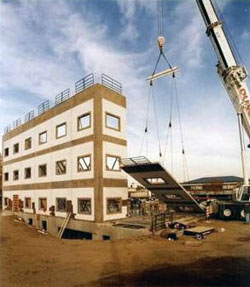
Panel Finishing
 The finish of a panel is limited only by the creativity of the architect and the abilities of the contractor. Common sandblasted or exposed aggregate finishes can be done immediately after panel erection. Painting, however, must wait until partial curing has taken place and residue from the bond breaker has been removed.
Most Tilt-Up concrete panels have an uneven or splotchy appearance when first stripped. These splotches usually fade after time. Uneven bond breaker application, standing water, slab porosity, and other factors can produce this effect. Sandblasting eliminates most of these inconsistencies. Washing also can improve appearance, but most Tilt-Up panels are eventually painted.
Before cleaning and painting panels, caulk joints and correct significant imperfections. The most frequently used paints are acrylic-based. Textured paints can be used for special effects. Banding or striping is a popular technique to produce variety and interest in Tilt-Up buildings. Reveals or recesses cast into the panel often are painted a contrasting or darker color for accent. The trompe l'oeil, or "fool-the-eye," effect is quite striking and popular.
Insulated Panels
 Insulated Tilt-Up panels are a rapidly growing market providing new opportunities to experienced and new Tilt-Up contractors. Several proprietary systems enable contractors to insulate panels during their construction or after the building is erected.
The basic forming and pouring process must be modified slightly to accommodate the sandwich wall systems. Higher side forms are needed to accommodate the insulation, and some systems require concrete placement on separate days.
Tilt-Up sandwich panels with as much as 6 inches of insulation and R values of 30 can be built. Usual applications include coolers and freezers.
Contractors can learn Tilt-Up on their own or work with consultants who can assist them on the entire project or just specific portions. In all cases, contractors should acquire as much background knowledge as possible and contact a professional architect or engineer who has Tilt-Up experience.